Introduction:
Stepper motors are widely used in various applications requiring precise control over rotational motion. The A4988 stepper motor driver is a popular choice for driving stepper motors due to its simplicity and reliability. In this tutorial, we will guide you through the process of interfacing a stepper motor with an Arduino using the A4988 driver.
Components Needed:
- Stepper motor (e.g., NEMA 17 with specifications such as step angle and holding torque) | here used is bipolar.
- A4988 stepper motor driver module.
- Arduino board (e.g., Arduino Uno).
- Power supply (e.g., 12V DC).
- Jumper wires.
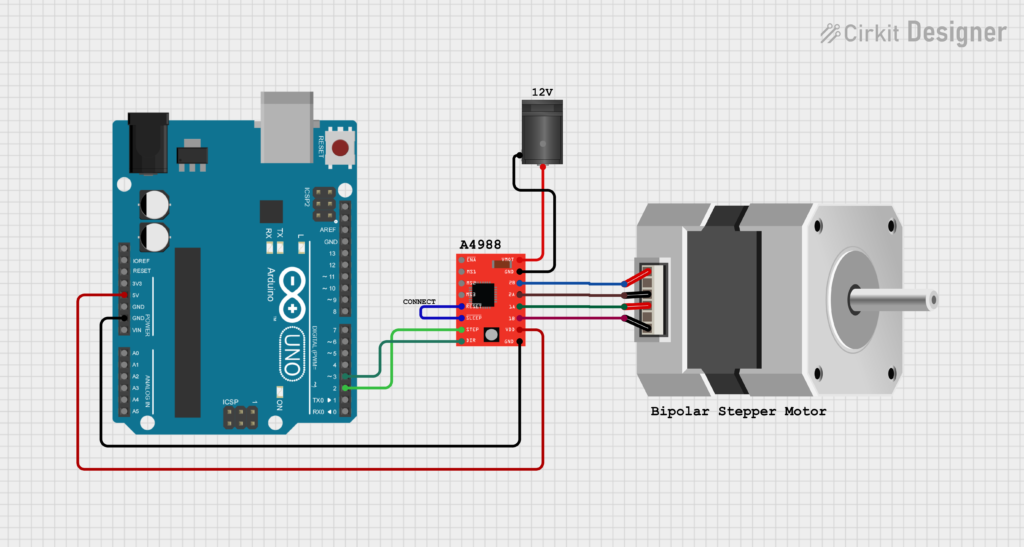
Wiring Diagram:
Connections:
- Stepper Motor to A4988 Driver:
- Coil Wire Connections: The stepper motor typically has four wires, which correspond to two coils. These coils are usually labeled as A, A’, B, and B’.
- Connect one coil to the A1 and A2 pins on the A4988 driver.
- Connect the other coil to the B1 and B2 pins on the A4988 driver.
- Note: The order of connecting wires from the stepper motor to the driver may vary. If the motor rotates in the wrong direction, simply swap the connections of one coil (e.g., interchange A1 with A2 or B1 with B2).
- Coil Wire Connections: The stepper motor typically has four wires, which correspond to two coils. These coils are usually labeled as A, A’, B, and B’.
- A4988 Driver to Arduino:
- Step Pin (STEP): Connects to a digital output pin on the Arduino (e.g., Pin 2).
- Direction Pin (DIR): Connects to another digital output pin on the Arduino (e.g., Pin 3).
- Enable Pin (EN): Connects to a digital output pin on the Arduino if you want to control the enable/disable functionality (optional).
- Power Supply:
- Motor Power Supply: Connect a suitable power supply (e.g., 12V DC) to the VMOT and GND pins on the A4988 driver. Ensure the voltage matches the motor’s specifications.
- Logic Power Supply: The A4988 driver also requires a logic power supply for its internal operations. This is usually connected to the VDD pin, which can be powered from the Arduino’s 5V output or an external 5V source. Ensure to connect GND to the GND pin on the Arduino to complete the circuit.
- Arduino to PC:
- Connect the Arduino board to your PC and upload the code and power the Arduino.

Additional Notes:
- Heat Sink: It’s recommended to attach a heat sink to the A4988 driver, especially if you’re driving the stepper motor at high currents or for prolonged periods, to prevent overheating.
- Current Limit Adjustment: The A4988 driver typically has a potentiometer to adjust the current limit. Adjust this carefully according to your stepper motor’s specifications to avoid damaging the motor.
- Microstepping: The A4988 driver supports microstepping, allowing for smoother motion. Adjust the MS1, MS2, and MS3 pins on the driver board to set the desired microstepping mode. Consult the A4988 datasheet for more details on microstepping configurations.
Arduino Code:
#include <AccelStepper.h>

#define MOTOR_PIN_STEP 2
#define MOTOR_PIN_DIR 3

AccelStepper stepper(1, MOTOR_PIN_STEP, MOTOR_PIN_DIR); // Define stepper motor object

void setup() {
  stepper.setMaxSpeed(1000); // Set maximum speed in steps per second
}

void loop() {
  // Rotate stepper motor 360 degrees in one direction
  stepper.setSpeed(500); // Set speed in steps per second
  stepper.moveTo(200); // Set target position
  stepper.runToPosition(); // Move to target position

  delay(1000); // Pause for 1 second

  // Rotate stepper motor 360 degrees in the opposite direction
  stepper.setSpeed(500); // Set speed in steps per second
  stepper.moveTo(0); // Set target position
  stepper.runToPosition(); // Move to target position

  delay(1000); // Pause for 1 second
}
Testing and Troubleshooting:
- Upload the code to the Arduino board using the Arduino IDE.
- If the motor does not move or behaves erratically, double-check the wiring and driver settings.
Conclusion:
Controlling a stepper motor with an A4988 driver and Arduino opens up a world of possibilities for various projects such as 3D printers, CNC machines, and robotic arms. By following this tutorial, you have learned the fundamentals of interfacing these components and can now apply this knowledge to your own projects.