Arduino Relay Home Automation
Are you looking to revolutionize the way you interact with your home? Introducing Arduino Relay Home Automation, your gateway to a smarter, more efficient living space. With the power of Arduino technology and relay modules, you can now automate and control various electrical appliances with ease.
How It Works
Arduino Relay Home Automation operates on a simple principle: using relay modules to control the electrical circuits of your appliances. The Arduino microcontroller acts as the brain of the system, executing commands based on user input or predefined automation rules. By interfacing with sensors and other input devices, the system can react intelligently to changes in the environment or user behavior.
Here are the steps to make connections and program your Arduino board to control a 4-channel relay module for your home automation project:
Step 1: Gather Components
For this you need following components:
- Arduino board (e.g., Arduino Uno)
- 4-channel relay module
- Jumper wires
- Electrical appliances or devices you want to control
Step 2: Make Connections
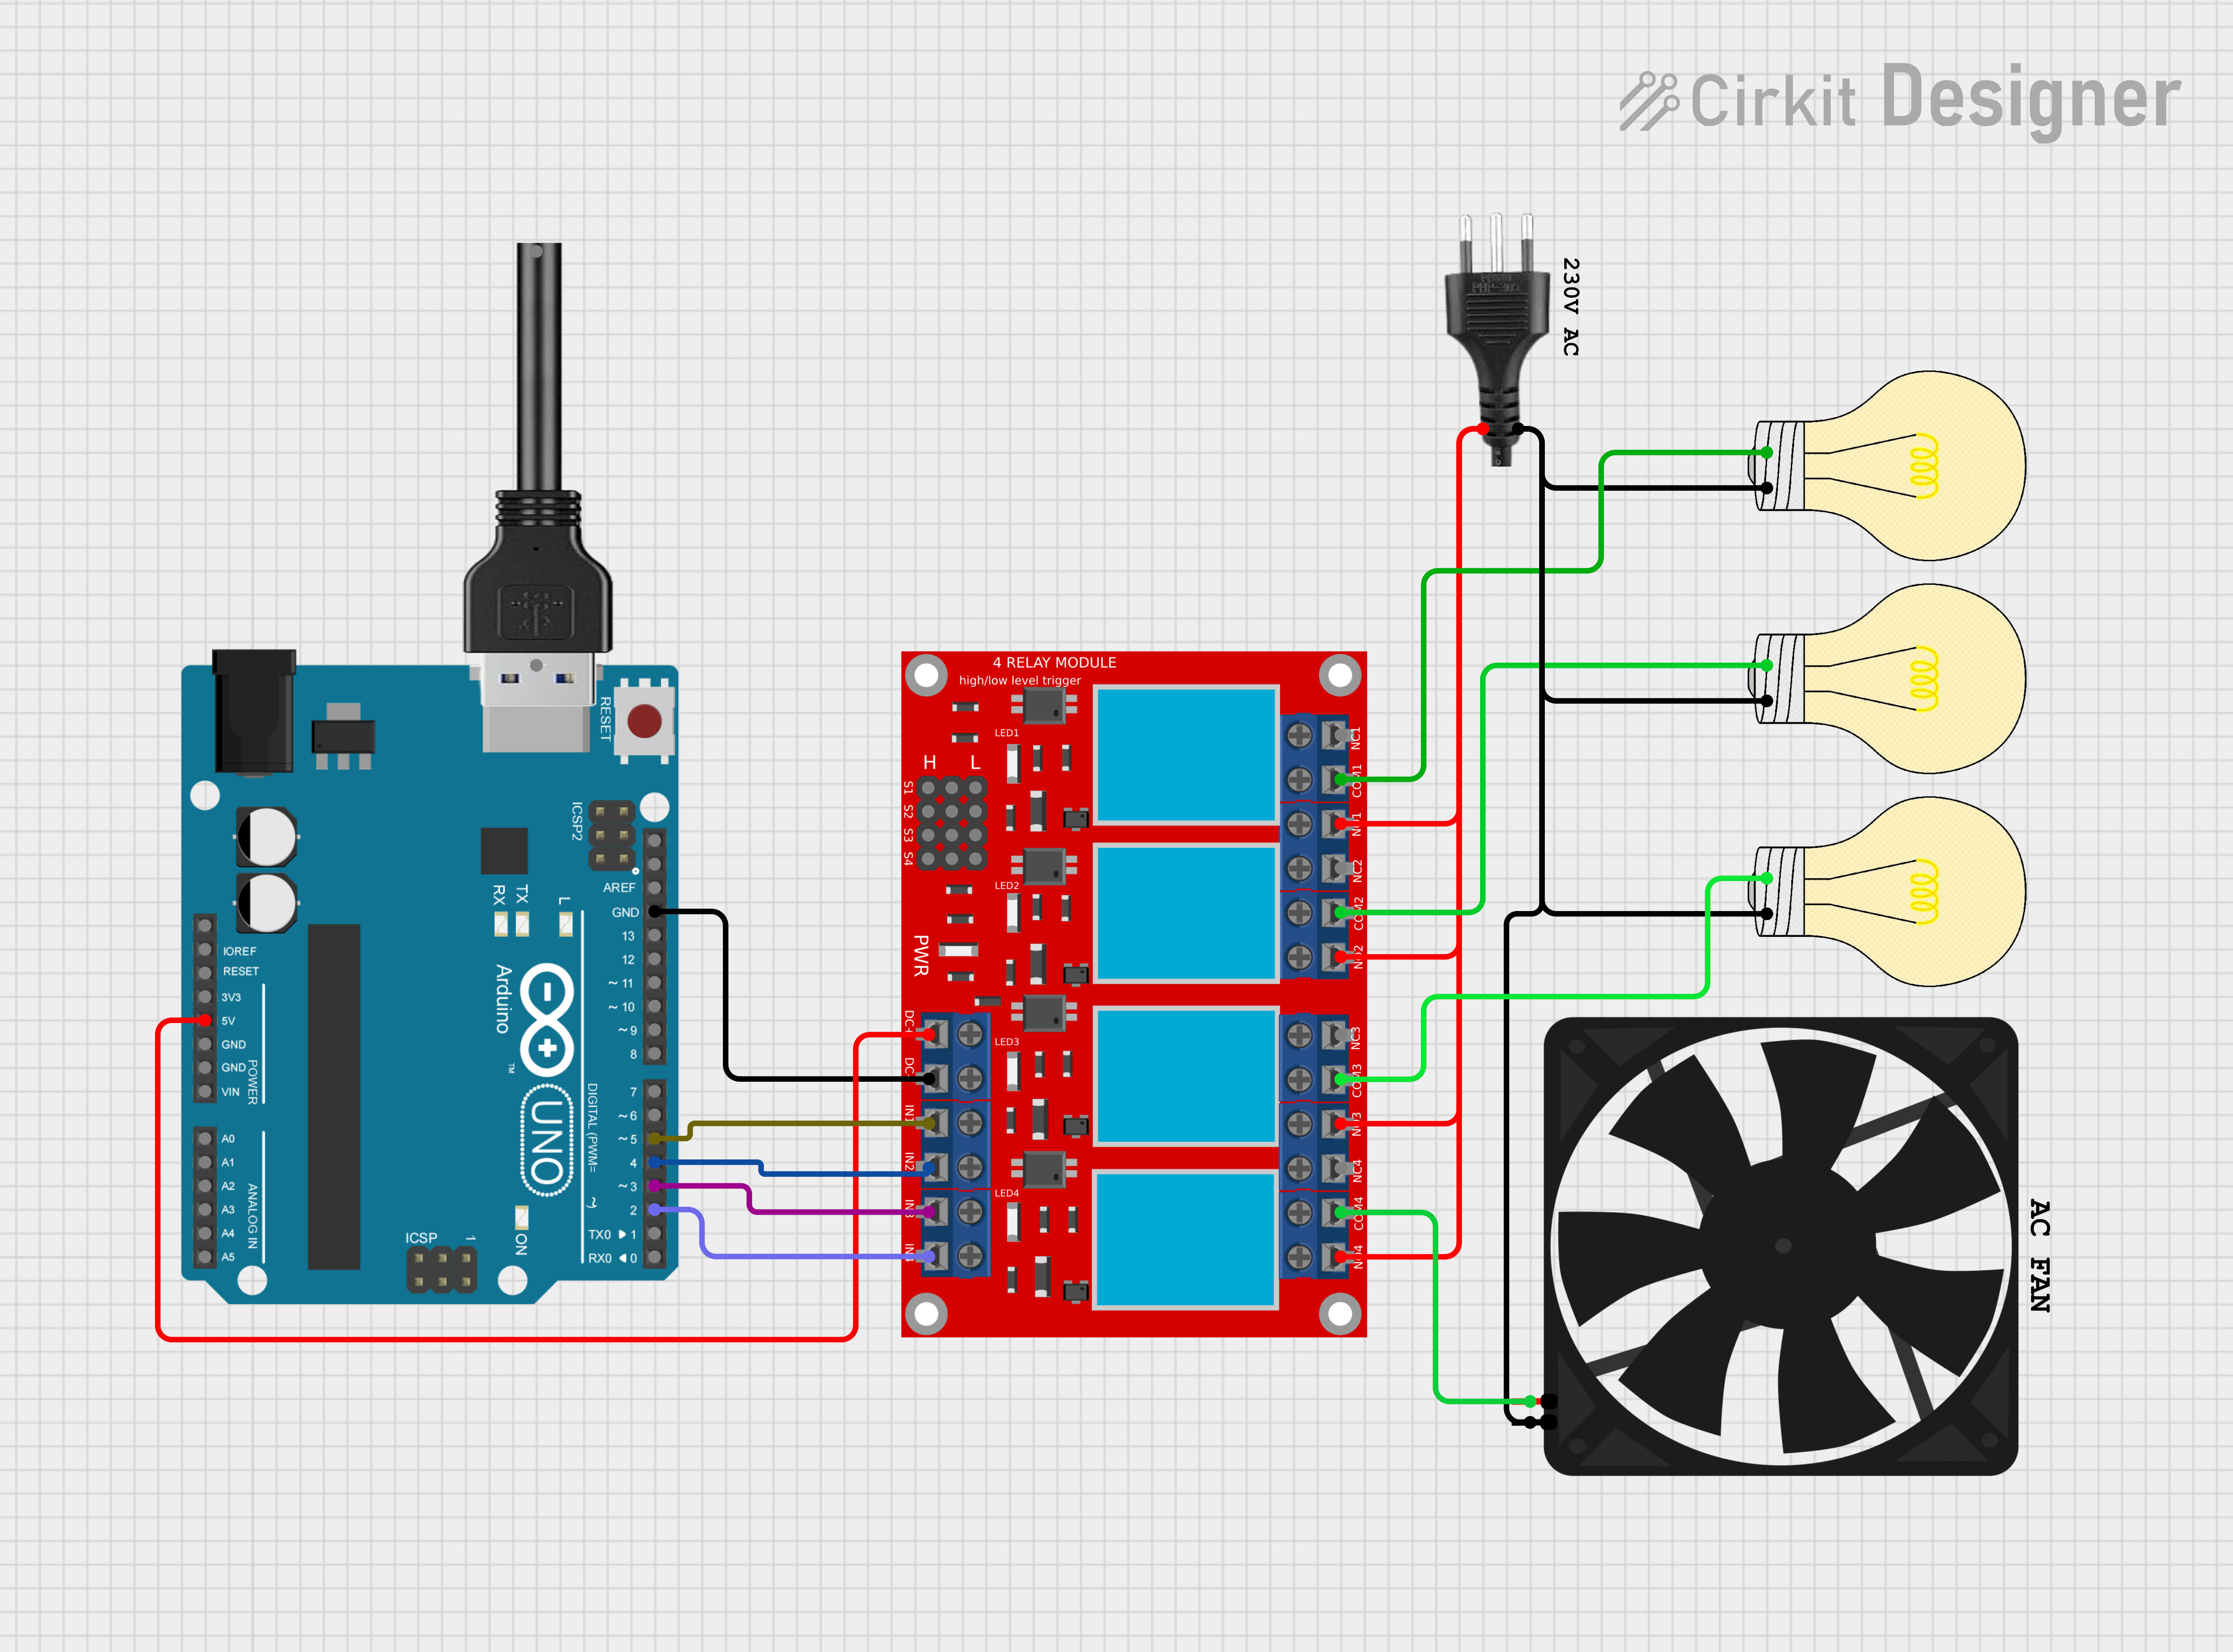
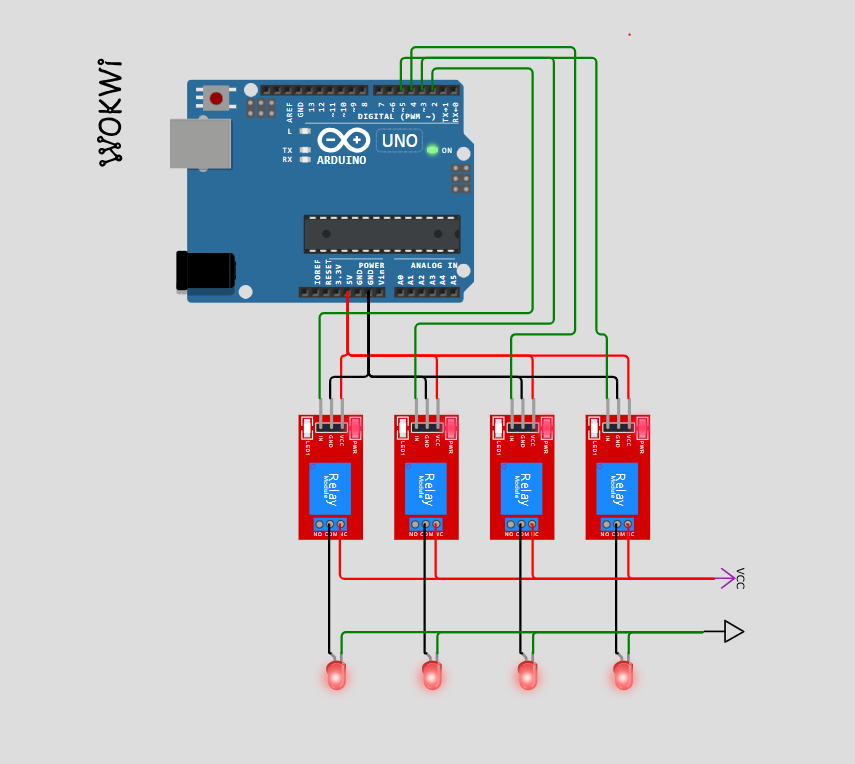
- Connect the VCC pin of Relay to the 5V pin on the Arduino board.
- Connect the GND pin of the relay module to any GND pin on the Arduino board.
- Connect each input signal pin of the relay module (IN1, IN2, IN3, IN4) to digital pins 2, 3, 4, and 5 on the Arduino board, respectively.
- Connect each output channel of the relay module (COM, NO) to the electrical appliance or device you want to control. Connect the NO (Normally Open) pin to the device and the COM (Common) pin to the power source (e.g., live wire).
Step 3: Write the Arduino Code
Here’s a simple Arduino code to control the 4-channel relay module:
#define RELAY_1 2
#define RELAY_2 3
#define RELAY_3 4
#define RELAY_4 5

void setup()
{
  pinMode(RELAY_1, OUTPUT);
  pinMode(RELAY_2, OUTPUT);
  pinMode(RELAY_3, OUTPUT);
  pinMode(RELAY_4, OUTPUT);
}

void loop()
{
  // Turn on each relay channel for 2 seconds, then turn it off
  digitalWrite(RELAY_1, HIGH);
  delay(2000);
  digitalWrite(RELAY_1, LOW);

  digitalWrite(RELAY_2, HIGH);
  delay(2000);
  digitalWrite(RELAY_2, LOW);

  digitalWrite(RELAY_3, HIGH);
  delay(2000);
  digitalWrite(RELAY_3, LOW);

  digitalWrite(RELAY_4, HIGH);
  delay(2000);
  digitalWrite(RELAY_4, LOW);
}
This code will sequentially turn on each relay channel for 2 seconds and then turn it off.
Step 4: Upload the Code
- Connect Arduino to your PC or Laptop using a USB cable.
- Now open the Arduino IDE software.
- Copy and paste the code into a new sketch in the Arduino IDE.
- Click on the “Upload” button to upload the code to your Arduino board.
Step 5: Test the Setup
- Once the code is uploaded successfully, disconnect the Arduino board from your computer.
- Connect the power supply to your Arduino board.
- Now, when you power on the Arduino board, it should sequentially turn on and off each relay channel every 2 seconds, controlling the connected electrical appliances or devices accordingly.

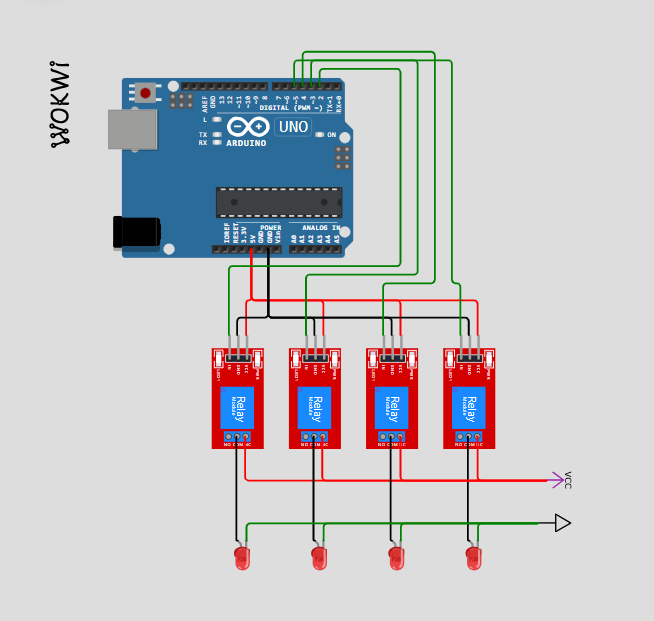
RELAY’s ON FOR TWO SECONDS

RELAY’s OFF FOR TWO SECONDS
That’s it! You have successfully set up and programmed your Arduino board to control a 4-channel relay module for your home automation project. You can further customize the code to add more features or functionality according to your requirements.
Now lets test with modified code to control all four relays through the Serial Monitor:
#define RELAY_1 2
#define RELAY_2 3
#define RELAY_3 4
#define RELAY_4 5

void setup()
{
  pinMode(RELAY_1, OUTPUT);
  pinMode(RELAY_2, OUTPUT);
  pinMode(RELAY_3, OUTPUT);
  pinMode(RELAY_4, OUTPUT);

  // Start serial communication
  Serial.begin(9600);
}

void loop()
{
  // Check if data is available to read from Serial Monitor
  if (Serial.available() > 0)
  {
    // Read the incoming byte from Serial Monitor
    char command = Serial.read();

    // Check the command received
    if (command == '1')
      {
      digitalWrite(RELAY_1, HIGH);  // Turn on Relay 1
      }
    else if (command == '2')
      {
      digitalWrite(RELAY_1, LOW);   // Turn off Relay 1
      }
    else if (command == '3')
      {
      digitalWrite(RELAY_2, HIGH);  // Turn on Relay 2
      }
    else if (command == '4')
      {
      digitalWrite(RELAY_2, LOW);   // Turn off Relay 2
      }
    else if (command == '5')
      {
      digitalWrite(RELAY_3, HIGH);  // Turn on Relay 3
      }
    else if (command == '6')
      {
      digitalWrite(RELAY_3, LOW);   // Turn off Relay 3
      }
    else if (command == '7')
      {
      digitalWrite(RELAY_4, HIGH);  // Turn on Relay 4
      }
    else if (command == '8')
      {
      digitalWrite(RELAY_4, LOW);   // Turn off Relay 4
      }
  }
}
With this code:
- Upload the code to your Arduino board.
- Open the Serial Monitor in the Arduino IDE.
- Type “1” in the Serial Monitor and press Enter. This will turn on Relay 1.
- Type “2” in the Serial Monitor and press Enter. This will turn off Relay 1.
- Similarly, type “3” to turn on Relay 2, “4” to turn off Relay 2, “5” to turn on Relay 3, “6” to turn off Relay 3, “7” to turn on Relay 4, and “8” to turn off Relay 4.
About Our Project
Arduino Relay Home Automation is a DIY project aimed at empowering individuals to create their own smart home solutions. By integrating Arduino microcontrollers with relay modules, we provide a versatile platform for building custom automation systems tailored to your specific needs.
Features
- Remote Control: Control your appliances from anywhere using your smartphone or computer. Whether you’re at home or on the go, you have full access to your home automation system.
- Scheduling: Set schedules to automate repetitive tasks, such as turning lights on and off at specific times or adjusting room temperature according to your daily routine.
- Sensor Integration: Expand the capabilities of your system by integrating various sensors like motion detectors, temperature sensors, and light sensors to trigger actions based on environmental conditions.
- Energy Efficiency: Optimize energy usage by monitoring and controlling devices more efficiently. With real-time energy consumption data, you can identify areas for improvement and reduce wastage.
- Expandability: The modular design of our system allows for easy expansion and customization. Add new functionalities or integrate third-party devices to enhance your smart home experience.