
Building an Arduino Ultrasonic Range Finder
Introduction
In this project, we’ll be creating an Ultrasonic Range Finder using Arduino. Ultrasonic sensors are widely used for distance measurement in various applications such as robotics, security systems, and automotive parking assistance. By utilizing the Arduino platform and an ultrasonic sensor, we can build a simple yet effective device capable of accurately measuring distances.
Components Required
- Arduino Uno board
- HC-SR04 Ultrasonic Sensor
- Jumper wires
- Breadboard
- USB cable (for connecting Arduino to computer)
- Computer with Arduino IDE installed
Circuit Diagram
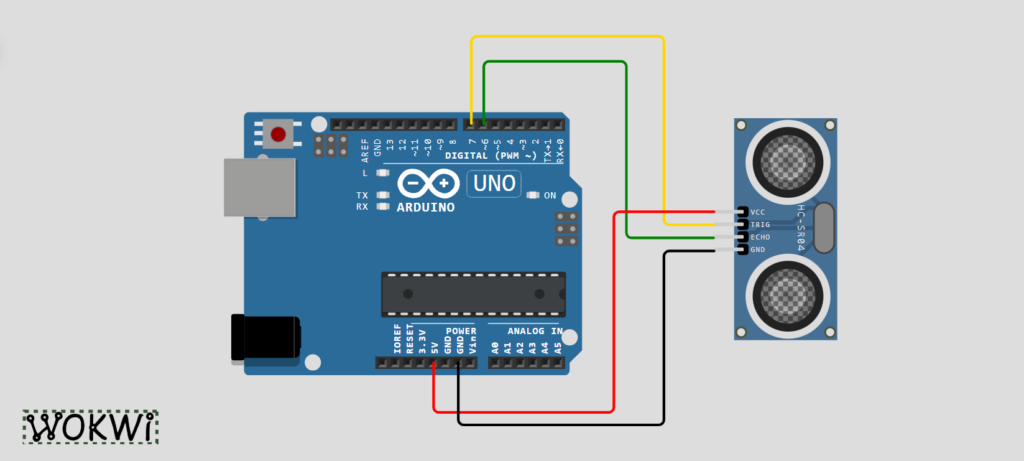
Setup and Connections
- Connect VCC of the ultrasonic sensor to the 5V of Arduino.
- GND of ultrasonic sensor to GND of Arduino.
- TRIG pin of the ultrasonic sensor to D7 (digital pin 7) of Arduino.
- ECHO pin of ultrasonic sensor to D6 (digital pin 6) on the Arduino.
Code:
// Define pins
#define TRIG_PIN 7
#define ECHO_PIN 6

// Define variables
long duration;
int distance;

void setup() {
  // Initialize serial communication
  Serial.begin(9600);

  // Set TRIG_PIN as an OUTPUT
  pinMode(TRIG_PIN, OUTPUT);

  // Set ECHO_PIN as an INPUT
  pinMode(ECHO_PIN, INPUT);
}

void loop() {
  // Clear the TRIG_PIN
  digitalWrite(TRIG_PIN, LOW);
  delayMicroseconds(2);

  // Set TRIG_PIN high for 10 microseconds
  digitalWrite(TRIG_PIN, HIGH);
  delayMicroseconds(10);
  digitalWrite(TRIG_PIN, LOW);

  // Measure the duration of the pulse on the ECHO_PIN
  duration = pulseIn(ECHO_PIN, HIGH);

  // Calculate the distance in centimeters
  distance = duration * 0.034 / 2;

  // Print the distance to the serial monitor
  Serial.print("Distance: ");
  Serial.print(distance);
  Serial.println(" cm");

  // Wait a short delay before taking the next measurement
  delay(500);
}
Testing and Calibration
- Upload the above code to the Arduino Uno board.
- Open the serial monitor in Arduino IDE and you will see readings.
- Ensure the ultrasonic sensor is placed facing an obstacle at a reasonable distance.
- Observe the distance measurements displayed in the serial monitor.
- Adjust the position of the sensor or modify the code if necessary for accurate readings.
When you upload and run this code on your Arduino board, it will continuously measure the distance using the ultrasonic sensor and print the distance readings to the serial monitor in the following format:
Distance: 183 cmApplication and Extensions
- This Ultrasonic Range Finder can be utilized in various projects such as obstacle avoidance robots, automated door opening systems, or even as a basic security alarm.
- You can enhance the project by adding a display module to visualize distance measurements or integrating multiple sensors for a wider range coverage.
Conclusion
By building this Arduino Ultrasonic Range Finder, you’ve gained practical experience in working with ultrasonic sensors and Arduino programming. The project opens doors to further exploration and customization in the realm of electronics and robotics. Have fun experimenting with different applications and expanding your knowledge!